This time of year always reminds me of the warm kitchens filled with sweet aromas, where family and friends gathered around classic desserts. The smell of chocolate chip cookies, apple pie, and rich brownies takes me back to my childhood. But as much as I adore those timeless treats, I also crave something fresh and exciting. That’s why I decided to create this post.
If you’re someone who loves dessert but also enjoys a modern twist, this one’s for you. Maybe you’re looking for a healthier take on your favorite cake, or a fun spin on the traditional cookie. Whatever your craving, I’ve gathered 23 delightful dessert recipe makeovers that will bring a modern flair to your classic favorites.
Get ready for some *fun*, *tasty*, and *creative* recipes that not only look great but will also impress anyone you serve them to. You’ll discover how to tweak familiar flavors into something new and unexpected. Imagine indulging in a rich chocolate cake that’s also vegan or a classic cheesecake made with lighter ingredients.
So, roll up your sleeves and grab your mixing bowls! You’re about to dive into a world where nostalgia meets innovation. With these recipes, you’ll find that you can enjoy all the sweet moments without losing the comfort of those classic flavors. Let’s make dessert exciting again!
Contents
- 1. Deconstructed Tiramisu Cups
- 2. Gluten-Free Chocolate Chip Cookies
- 3. Avocado Chocolate Mousse
- 4. Mini Cheesecakes with Fruit Toppings
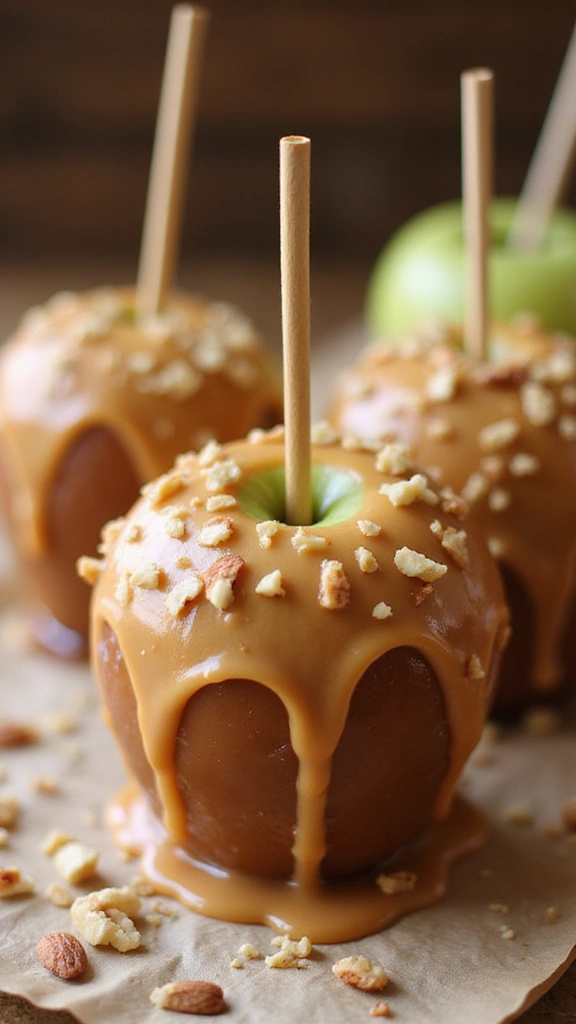
- 5. Salted Caramel Brownies
- 6. Lavender Lemon Bars
- 7. Matcha Green Tea Cookies
- 8. Peach Galette with Almond Cream
- 9. Chocolate-Dipped Fruit Skewers
- 10. Spiced Chai Pudding
- 11. Nutella-Stuffed Puff Pastry
- 12. Raspberry Mint Sorbet
- 13. Pecan Pie Bars with Maple Drizzle
- 14. Carrot Cake Cupcakes with Cream Cheese Frosting
- 15. Coconut Macaroons with Dark Chocolate Drizzle
- 16. Blueberry Crumble Bars
- 17. S’mores Dip
- 18. Mango Sticky Rice
- 19. Pistachio Baklava Bites
- 20. Almond Joy Energy Bites
- 21. Strawberry Shortcake Parfaits
- 22. Chocolate Hazelnut Pancakes
- 23. Churros with Chocolate Sauce
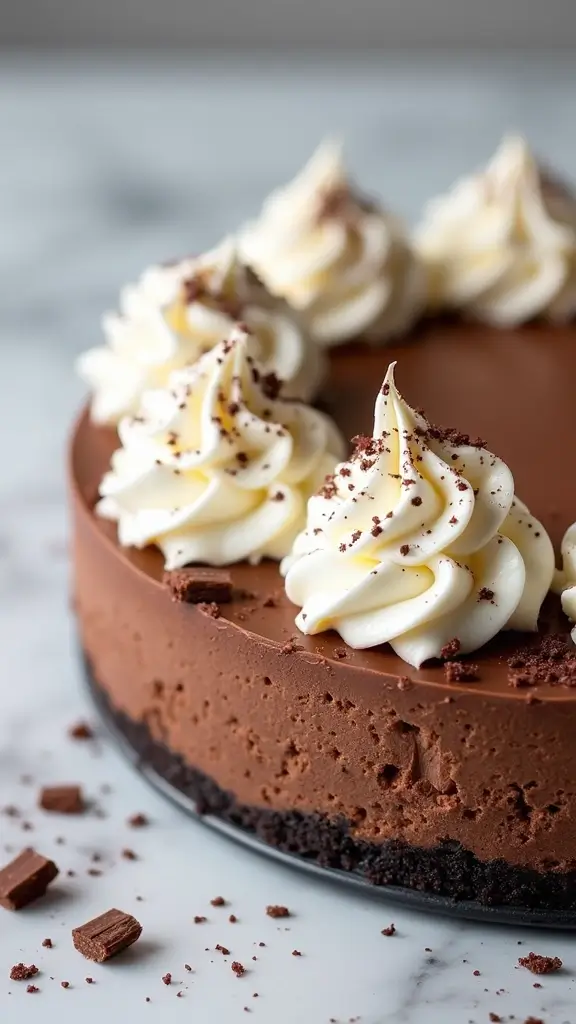
1. Deconstructed Tiramisu Cups
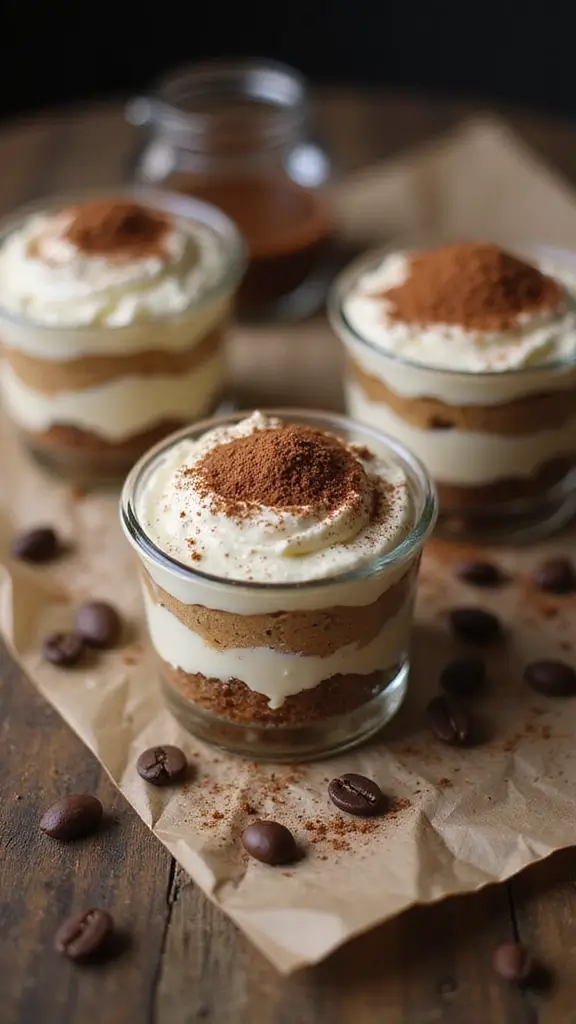
Get ready to impress your guests with deconstructed tiramisu cups! This modern twist on the classic Italian dessert puts a fun spin on a beloved favorite. Imagine layers of coffee-soaked ladyfingers and creamy mascarpone, all beautifully presented in individual cups. Each spoonful delivers a delightful burst of rich coffee flavor and sweet creaminess, making it an ideal finish for any dinner party.
These cups are not just tasty; they’re easy to assemble! Spend just 20 minutes putting them together, and chill them for a couple of hours. They look stunning and taste divine. Pair these treats with a sweet dessert wine like Moscato or a rich Vin Santo for an extra special touch.
Recipe Overview
– Servings: 4
– Prep Time: 20 minutes
– Total Time: 20 minutes (plus chill time)
– Calories: Approximately 300 per cup
Ingredients
– 1 cup brewed espresso, cooled
– 2 tablespoons coffee liqueur (like Kahlúa)
– 12 ladyfinger cookies
– 1 cup mascarpone cheese
– 1 cup heavy whipping cream
– 1/4 cup sugar
– Cocoa powder for dusting
Instructions
1. In a bowl, combine the cooled espresso and coffee liqueur.
2. Quickly dip each ladyfinger into the espresso mix and layer them in your cups.
3. In another bowl, whip the heavy cream until soft peaks form. Gradually add sugar and mascarpone, mixing until smooth.
4. Spoon the mascarpone mixture over the ladyfingers.
5. Continue layering until the cups are full.
6. Chill for at least 2 hours. Before serving, dust the tops with cocoa powder.
For a chocolatey twist, sprinkle grated dark chocolate between layers.
Choose clear cups to show off the beautiful layers!
Frequently Asked Questions
– How long can I keep these? They stay fresh in the fridge for 2-3 days!
– Can I make these ahead of time? Yes! They’re perfect for prepping before entertaining!
2. Gluten-Free Chocolate Chip Cookies
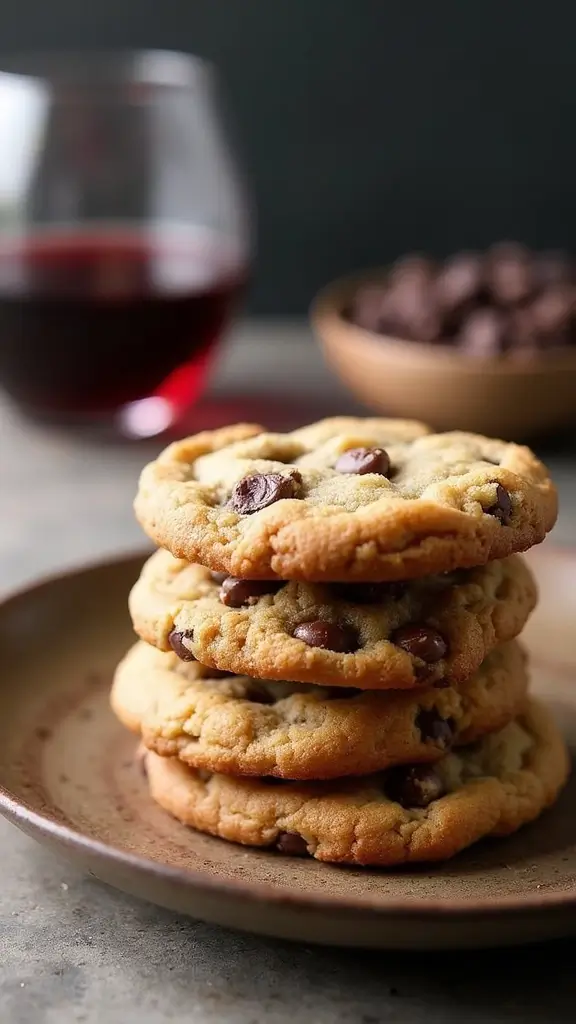
Wave goodbye to dull gluten-free goodies! These Gluten-Free Chocolate Chip Cookies are soft and chewy, bursting with rich chocolate chips. With almond flour and oats, they fit perfectly into your gluten-free lifestyle while keeping taste front and center.
Imagine these cookies at your next gathering. They’re great for cozy family movie nights or chic dessert tables. Surprise your guests by pairing them with a glass of bold Cabernet Sauvignon for an unexpected flavor twist.
Recipe Overview:
– Servings: 12 cookies
– Prep Time: 15 minutes
– Cook Time: 10 minutes
– Total Time: 25 minutes
– Calories: About 180 per cookie
Ingredients:
– 2 cups almond flour
– 1/2 cup gluten-free oats
– 1/2 teaspoon baking soda
– 1/4 teaspoon salt
– 1/4 cup melted coconut oil
– 1/4 cup honey or maple syrup
– 1 teaspoon vanilla extract
– 1/2 cup chocolate chips
Instructions:
1. Preheat your oven to 350°F (175°C). Line a baking sheet with parchment paper.
2. In one bowl, mix almond flour, oats, baking soda, and salt.
3. In another bowl, whisk together melted coconut oil, honey, and vanilla.
4. Combine the wet and dry ingredients. Gently fold in the chocolate chips.
5. Scoop tablespoon-sized dough onto the prepared baking sheet.
6. Bake for 10-12 minutes, until the edges are lightly golden.
7. Allow them to cool on the baking sheet for a few minutes before moving them to a wire rack.
Pro Tip: Sprinkle sea salt on top just before baking for an extra kick. If you want a vegan option, swap honey for agave syrup.
Frequently Asked Questions:
– Can I use regular flour? Stick with almond flour for this gluten-free recipe.
– How should I store these cookies? Keep them in an airtight container for up to a week!
These cookies show that gluten-free can be delicious! Enjoy every bite and share them with friends and family.
3. Avocado Chocolate Mousse
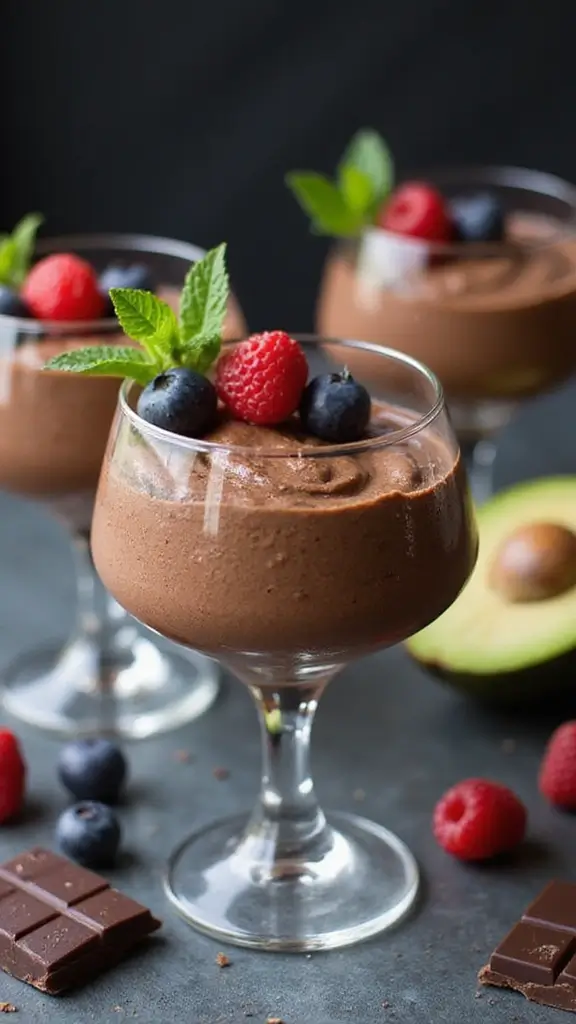
Craving a dessert that’s both delicious and nutritious? Try this Avocado Chocolate Mousse. It’s a modern take on a classic favorite that will surprise your taste buds. With creamy avocados, rich cocoa powder, and a touch of honey, this mousse satisfies your chocolate cravings while being dairy-free and packed with healthy fats.
Serve it at your next gathering or as a sweet ending to a romantic dinner. Everyone will wonder what makes it so special. Pair it with a refreshing sparkling Rosé for a delightful contrast that enhances the flavors.
Here’s how to make it:
Recipe Overview
– Servings: 4
– Prep Time: 10 minutes
– Total Time: 10 minutes
– Calories: Approximately 250 per serving
Ingredients
– 2 ripe avocados, peeled and pitted
– 1/2 cup cocoa powder
– 1/4 cup honey or maple syrup
– 1 teaspoon vanilla extract
– A pinch of sea salt
– Optional toppings: whipped coconut cream, fresh berries
Instructions
1. In a food processor, blend the avocados until smooth.
2. Add the cocoa powder, honey, vanilla, and sea salt. Blend until well combined.
3. Taste and adjust sweetness if needed.
4. Spoon the mousse into serving glasses and chill for at least 30 minutes.
5. Top with whipped coconut cream and berries before serving.
Tips for Perfect Mousse:
– Use perfectly ripe avocados for a creamy texture.
– Make this dessert a day ahead for easy entertaining.
Common Questions:
– Will I taste the avocado? No! The rich chocolate flavor takes over.
– How long can I store this mousse? It keeps well in the fridge for up to 4 days!
4. Mini Cheesecakes with Fruit Toppings
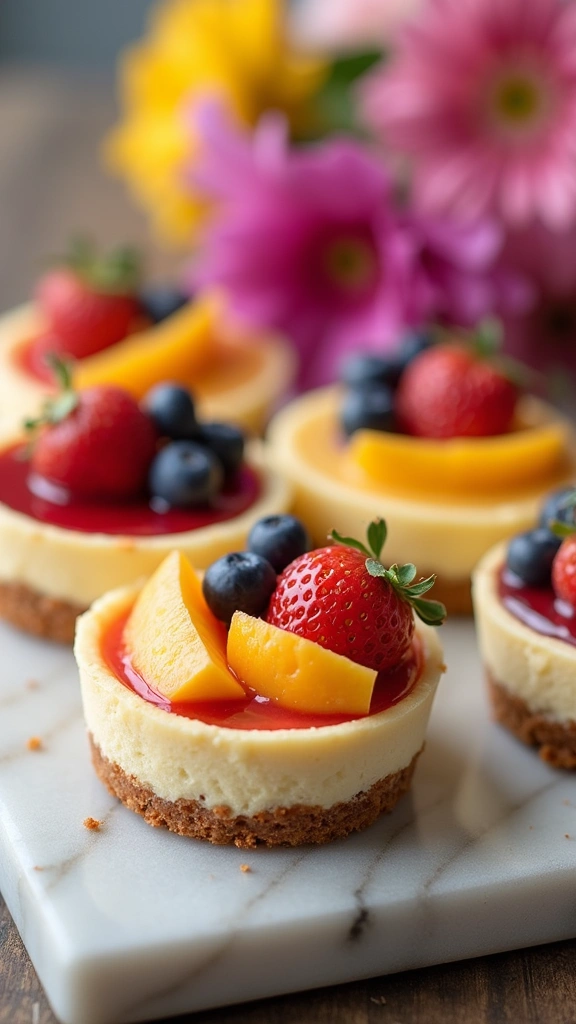
Imagine serving up delightful mini cheesecakes at your next gathering. These charming treats are not only a feast for the eyes but also a creamy indulgence that everyone will love. Topped with fresh fruits, they offer a burst of color and flavor. With a buttery graham cracker crust, every bite melts in your mouth. Plus, they’re simple enough to whip up in no time!
You can let your guests personalize their desserts. Think blueberries, strawberries, or even a drizzle of rich chocolate. Pair them with a sweet dessert wine, like late harvest Riesling, for a truly memorable experience.
Recipe Overview
– Servings: 12 mini cheesecakes
– Prep Time: 20 minutes
– Cook Time: 20 minutes
– Total Time: 40 minutes
– Calories: About 230 per cheesecake
Ingredients
– 1 cup graham cracker crumbs
– 1/4 cup sugar
– 1/4 cup melted butter
– 12 ounces cream cheese, softened
– 1/2 cup sugar
– 1 teaspoon vanilla extract
– 2 large eggs
– Fresh fruit for topping: berries, mango, etc.
Instructions
1. Preheat your oven to 325°F (160°C).
2. In a bowl, combine graham cracker crumbs, sugar, and melted butter. Mix well.
3. Press the mixture into the bottoms of lined muffin tins.
4. In another bowl, beat cream cheese, sugar, and vanilla until smooth.
5. Add eggs one at a time, mixing until fully combined.
6. Pour the filling over the crusts in the muffin tins.
7. Bake for 20 minutes or until the center is slightly jiggly.
8. Let them cool, then refrigerate for at least 2 hours before adding your fruit topping.
Tips for Serving
– Use a piping bag to elegantly add fruit or sauces.
– Make them a day ahead to allow flavors to blend beautifully.
Frequently Asked Questions
– Can I use low-fat cream cheese? Yes, it still tastes great!
– How long do they keep? Store in the fridge for up to 3 days.
These mini cheesecakes are perfect for any occasion. They’re sweet, sophisticated, and sure to impress your guests!
5. Salted Caramel Brownies
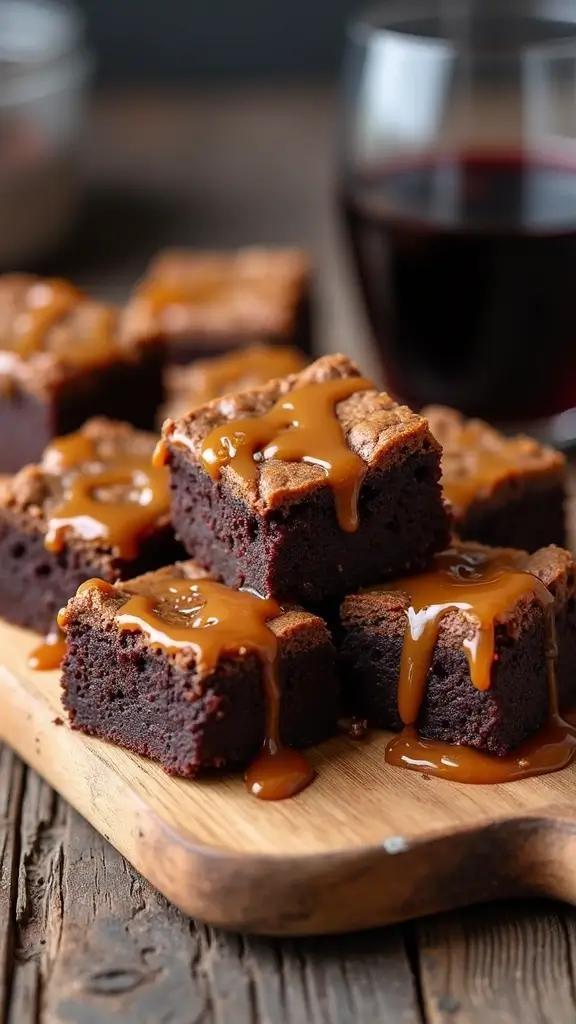
Dive into the delicious world of salted caramel brownies! These treats are the perfect blend of gooey chocolate and creamy salted caramel. Imagine biting into a rich brownie, only to hit the surprise layer of smooth caramel. It’s a delightful twist on a classic dessert that will wow your guests at parties or simply sweeten up your cozy movie nights.
To elevate your experience, enjoy these brownies with a glass of rich port wine. The flavors complement each other beautifully, making every bite a celebration.
Recipe Overview
– Servings: 16 brownies
– Prep Time: 30 minutes
– Cook Time: 30 minutes
– Total Time: 1 hour
– Calories: Approximately 350 per brownie
Ingredients
– 1 cup unsalted butter, melted
– 2 cups sugar
– 4 large eggs
– 1 teaspoon vanilla extract
– 1 cup all-purpose flour
– 1 cup cocoa powder
– 1/2 teaspoon salt
– 1/2 cup salted caramel sauce (store-bought or homemade)
Instructions
1. Preheat the oven to 350°F (175°C). Grease a 9×13 inch baking pan.
2. In a large bowl, mix melted butter and sugar until smooth.
3. Add eggs one at a time, mixing well after each addition. Stir in vanilla.
4. Combine flour, cocoa powder, and salt into the mixture. Mix until just combined.
5. Pour half of the brownie batter into the pan, spreading evenly.
6. Drizzle salted caramel sauce over the first layer. Pour the remaining brownie batter on top.
7. Bake for 30 minutes, or until a toothpick comes out with a few moist crumbs.
8. Allow to cool before cutting into squares.
Tips for Enjoyment
– Add extra caramel sauce on top for a gorgeous finish.
– Mix in chocolate chunks for an extra chocolatey surprise.
Frequently Asked Questions
– Can I make these ahead of time? Yes! They stay fresh in an airtight container for up to a week.
– How do I prevent sticking? Grease your pan well and use parchment paper for easy removal.
Now, you’re ready to impress with these salted caramel brownies! They’re sure to be a hit wherever you serve them.
6. Lavender Lemon Bars
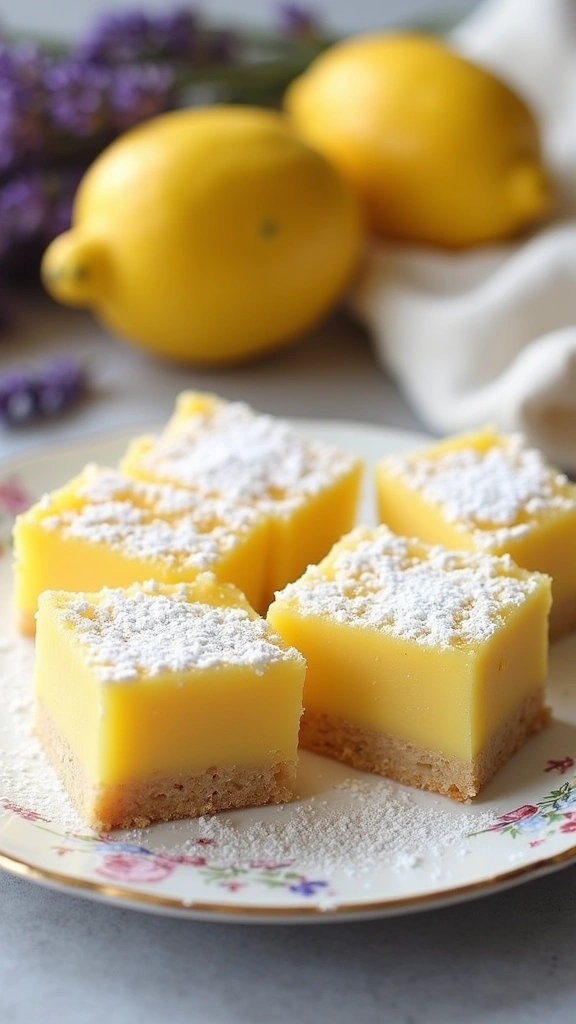
Imagine biting into a square of sunshine! These lavender lemon bars bring a refreshing twist to a classic dessert. The bright, zesty lemon flavor dances with the delicate floral notes of lavender, creating a treat that feels both sophisticated and inviting. Perfect for springtime gatherings or a cozy afternoon tea, these bars will surely impress your guests.
Want to make them even more delightful? Pair your bars with a chilled glass of Sauvignon Blanc. The crispness of the wine complements the bars beautifully.
Here’s how to whip up these delicious bars at home:
Recipe Overview
– Servings: 16 bars
– Prep Time: 20 minutes
– Cook Time: 25 minutes
– Total Time: 45 minutes
– Calories: Approximately 200 per bar
Ingredients
– 1 cup softened butter
– 1 cup sugar
– 2 cups all-purpose flour
– 1/4 cup cornstarch
– 1/2 teaspoon baking powder
– 1/4 teaspoon salt
– 4 large eggs
– 1 cup freshly squeezed lemon juice
– 2 tablespoons dried lavender
Instructions
1. Preheat your oven to 350°F (175°C) and grease a baking dish.
2. In a bowl, beat the softened butter and sugar until fluffy.
3. Gradually mix in the flour, cornstarch, baking powder, and salt until combined.
4. Press this mixture into the bottom of your baking dish and bake for 20 minutes.
5. In another bowl, whisk together the eggs, lemon juice, and dried lavender.
6. Pour this lemon mixture over the baked crust and return to the oven for an additional 25 minutes.
7. Once cooled, cut into bars and dust with powdered sugar.
For a more intense lavender flavor, try steeping fresh lavender in your lemon juice for 30 minutes before using it. Enjoy these bars chilled for the best experience!
Frequently Asked Questions
– Where can I find dried lavender? Check your local grocery store or online retailers!
– How should I store these bars? Keep them in the fridge for up to a week for freshness!
7. Matcha Green Tea Cookies
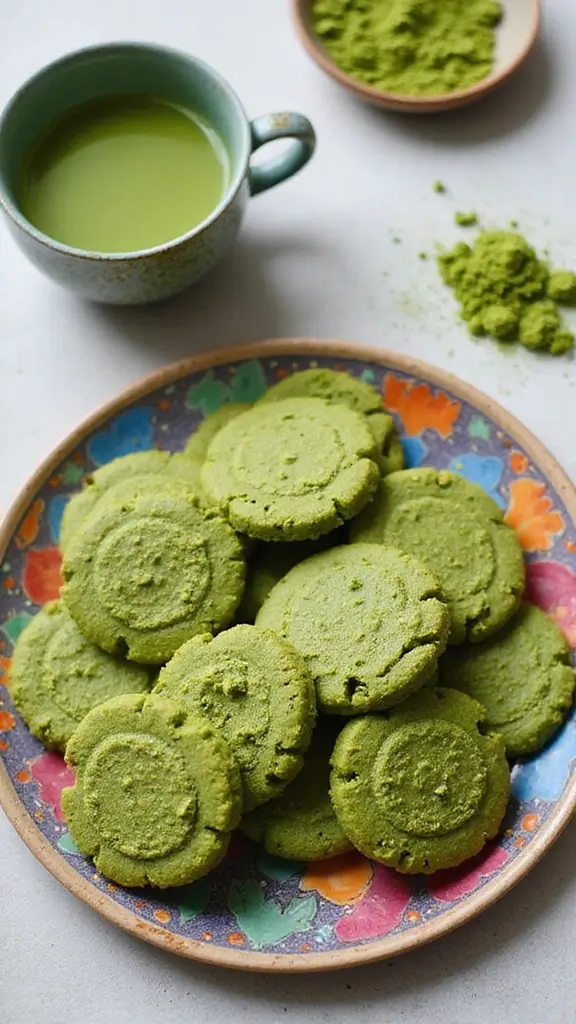
Brighten up your dessert table with colorful matcha green tea cookies! These treats are not just a feast for the eyes; they offer a delightful blend of earthy and subtly sweet flavors. The vibrant green hue comes from matcha powder, which also adds health benefits. These cookies are perfect for any gathering, from casual get-togethers to more formal celebrations.
Enjoy them with a refreshing green tea latte or a glass of light white wine for a delicious pairing.
Recipe Overview
– Servings: 20 cookies
– Prep Time: 15 minutes
– Cook Time: 10 minutes
– Total Time: 25 minutes
– Calories: About 120 per cookie
Ingredients
– 1 cup all-purpose flour
– 2 tablespoons matcha powder
– 1/2 teaspoon baking powder
– 1/4 teaspoon salt
– 1/2 cup unsalted butter, softened
– 1/2 cup granulated sugar
– 1/4 cup brown sugar
– 1 large egg
– 1 teaspoon vanilla extract
Instructions
1. Preheat your oven to 350°F (175°C) and line a baking sheet with parchment paper.
2. In a bowl, mix together the flour, matcha powder, baking powder, and salt.
3. In another bowl, cream the softened butter with granulated and brown sugars until it’s light and fluffy.
4. Beat in the egg and vanilla extract until well combined.
5. Gradually add the dry ingredients to the wet mixture and stir until just combined.
6. Drop tablespoon-sized balls of dough onto the prepared baking sheet.
7. Bake for 10-12 minutes, or until the edges are set and the centers look slightly soft.
8. Allow the cookies to cool before enjoying.
Extra Tips:
– Drizzle melted white chocolate over the cooled cookies for an extra touch of sweetness.
– Store your cookies in an airtight container to keep them fresh for up to a week.
Frequently Asked Questions
– Can I use a different type of tea? Absolutely! Experiment with your favorite tea flavors for a fun twist.
– How long do these cookies last? They can last up to a week in an airtight container, but we doubt they’ll last that long!
These cookies are not only a treat for your taste buds but also a unique way to impress your guests. Enjoy the process of baking and the delightful results!
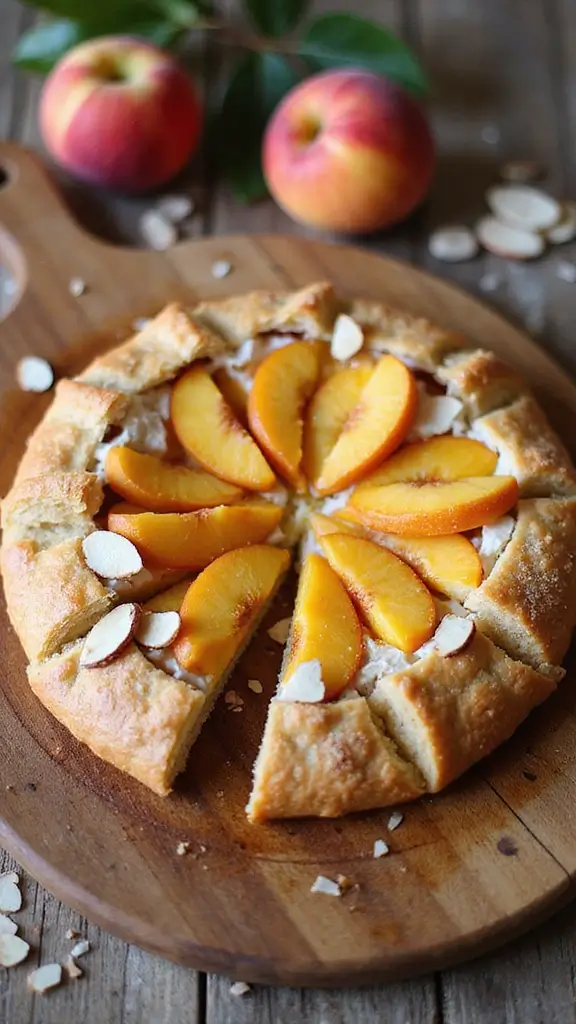
8. Peach Galette with Almond Cream
Capture the joy of summer with a delightful peach galette, highlighting the juicy sweetness of ripe peaches. This rustic dessert is easy to make and looks stunning on any table. The flaky crust pairs perfectly with a creamy almond filling, making each bite a treat you won’t forget. Serve it warm with a glass of chilled rosé for a truly refreshing experience.
Here’s how to whip it up!
Recipe Overview:
– Servings: 8
– Prep Time: 25 minutes
– Cook Time: 40 minutes
– Total Time: 1 hour, 5 minutes
– Calories: About 280 per slice
Ingredients:
– 1 pre-made pie crust or homemade pastry
– 4 ripe peaches, sliced
– 1/2 cup almond flour
– 1/4 cup sugar
– 1 teaspoon almond extract
– 1 egg, beaten (for egg wash)
– 1 tablespoon sliced almonds for topping
Instructions:
1. Preheat your oven to 375°F (190°C) and roll out the pie crust on a baking sheet.
2. In a bowl, combine almond flour, sugar, and almond extract until smooth.
3. Spread this almond mixture over the center of the pie crust, leaving a border around the edges.
4. Layer the sliced peaches on top of the almond cream.
5. Fold the crust edges over the fruit for a rustic look, then brush with the beaten egg.
6. Sprinkle sliced almonds on top for crunch.
7. Bake for 35-40 minutes, or until the crust turns golden brown. Let cool slightly before serving.
Want to make it even more special? Try adding a scoop of vanilla ice cream on the side. You can also experiment with different fruits like berries or apples for variety!
Frequently Asked Questions:
– Can I use frozen peaches? Yes, just thaw them first and drain the extra moisture.
– How should I store leftovers? Keep them in an airtight container in the fridge for up to 3 days.
9. Chocolate-Dipped Fruit Skewers
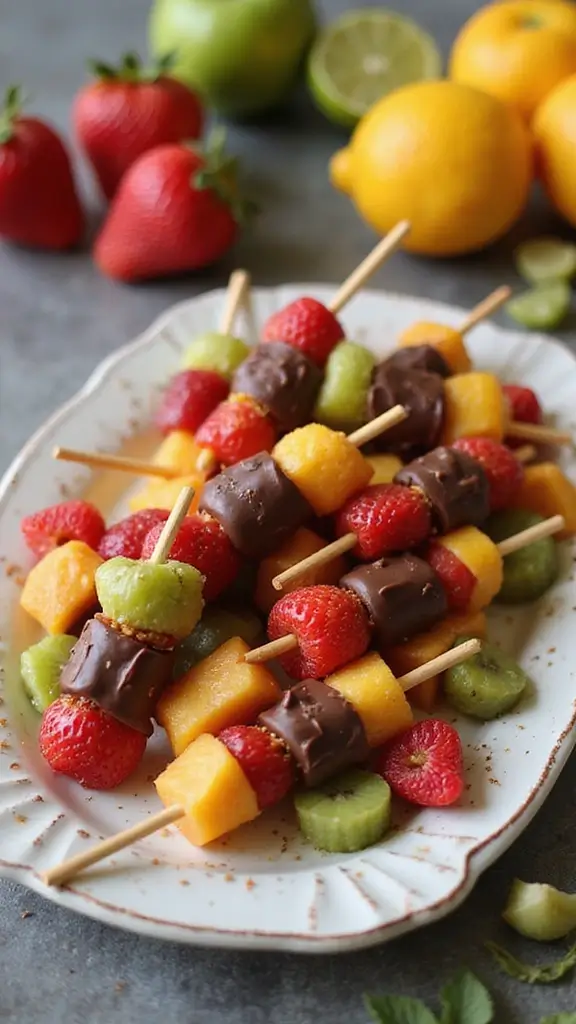
Craving a dessert that wows your guests without a lot of fuss? Try these Chocolate-Dipped Fruit Skewers! They bring together the sweetness of fresh fruit and the richness of chocolate, making every bite a delightful experience. Picture juicy strawberries, ripe bananas, and tropical pineapple all dressed up in smooth, melted chocolate. It’s a fun treat that’s perfect for any gathering or simply a sweet snack at home.
Want to impress? Pair these skewers with a refreshing fruity sparkling wine. The bubbly adds a festive flair, transforming your simple dessert into a celebration!
Recipe Overview
– Servings: 10 skewers
– Prep Time: 15 minutes
– Cook Time: 5 minutes
– Total Time: 20 minutes
– Calories: Approximately 150 per skewer
Ingredients
– 1 cup strawberries, hulled
– 1 banana, sliced
– 1 cup pineapple chunks
– 1 cup dark chocolate chips
– 1 tablespoon coconut oil
Instructions
1. Melt the dark chocolate and coconut oil together in a microwave or double boiler until smooth.
2. Thread your favorite fruit onto skewers in any order you like.
3. Dip each skewer into the melted chocolate, letting the extra chocolate drip off.
4. Place the skewers on parchment paper and refrigerate until the chocolate hardens.
5. Serve chilled for a fun and fruity dessert!
For an extra crunch, sprinkle crushed nuts or shredded coconut on the chocolate before it sets. You can also drizzle white chocolate over the dark for a stunning look!
Frequently Asked Questions
– What other fruits can I use? Use any fruit you love—kiwi, apples, or grapes work great!
– How do I store leftovers? Keep them in the fridge, covered, for up to 2 days.
These Chocolate-Dipped Fruit Skewers are not just easy to make; they’re also a fun way to enjoy fruit. You’ll love how simple it is to create a dessert that’s both tasty and visually appealing!
10. Spiced Chai Pudding
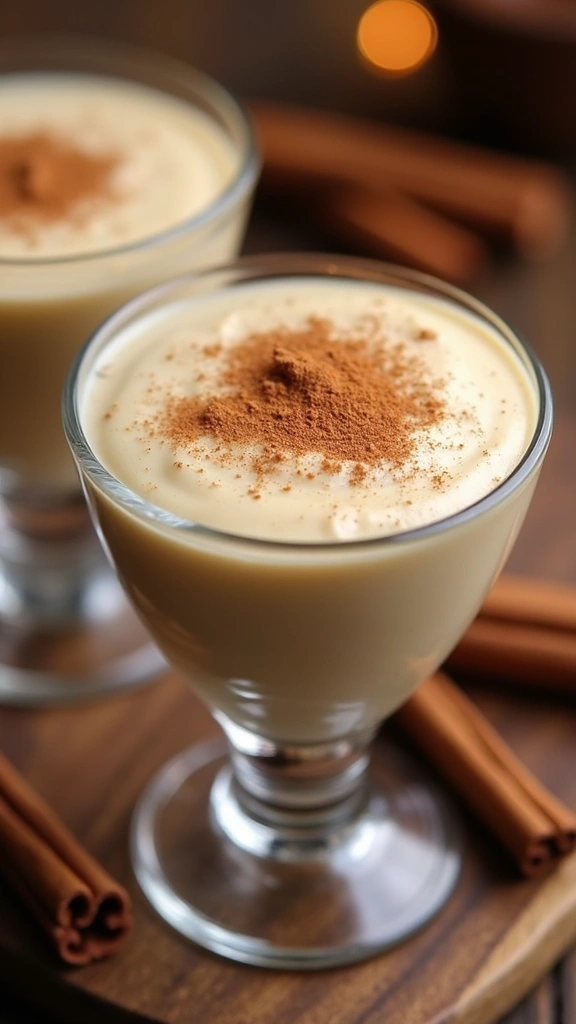
Warm up your dessert game with a delightful Spiced Chai Pudding! This creamy treat, infused with the rich flavors of chai spices, wraps you in comfort. It’s not just a dessert; it’s a cozy experience, perfect for chilly evenings or as a surprising delight for guests. Picture this: a chilled pudding topped with a sprinkle of cinnamon, ready to impress.
You can elevate your dessert by pairing it with a glass of spiced white wine or a steaming cup of coffee. It’s a combination that enhances the warm, inviting flavors of the pudding.
Recipe Overview
– Servings: 4
– Prep Time: 15 minutes
– Cook Time: 20 minutes
– Total Time: 35 minutes
– Calories: About 220 per serving
Ingredients
– 1 cup almond milk
– 1/2 cup coconut milk
– 1/4 cup sugar
– 1/2 teaspoon vanilla extract
– 2 tablespoons chai tea leaves or 2 tea bags
– 2 tablespoons cornstarch
Instructions
1. In a saucepan, bring almond and coconut milk to medium heat. Stir in sugar and your choice of chai spices.
2. If using loose tea, steep it in the milk until fragrant, then strain it out.
3. In a separate bowl, mix cornstarch with a little water until smooth.
4. Gradually stir the cornstarch mixture into the warm milk, stirring constantly until it thickens.
5. Pour into serving dishes and refrigerate until set, about 2 hours.
6. Serve chilled, topped with a sprinkle of cinnamon for an extra kick.
Feel free to add a hint of ginger or nutmeg for a deeper flavor. And the best part? You can make this pudding a couple of days ahead, making it a great choice for entertaining!
Frequently Asked Questions
– Can I use regular milk? Yes, any milk works!
– How long can I keep this pudding? It lasts up to a week in the fridge!
With this Spiced Chai Pudding, you have a dessert that’s not only easy to make but also brings warmth and joy to any occasion. Enjoy every spoonful!
11. Nutella-Stuffed Puff Pastry
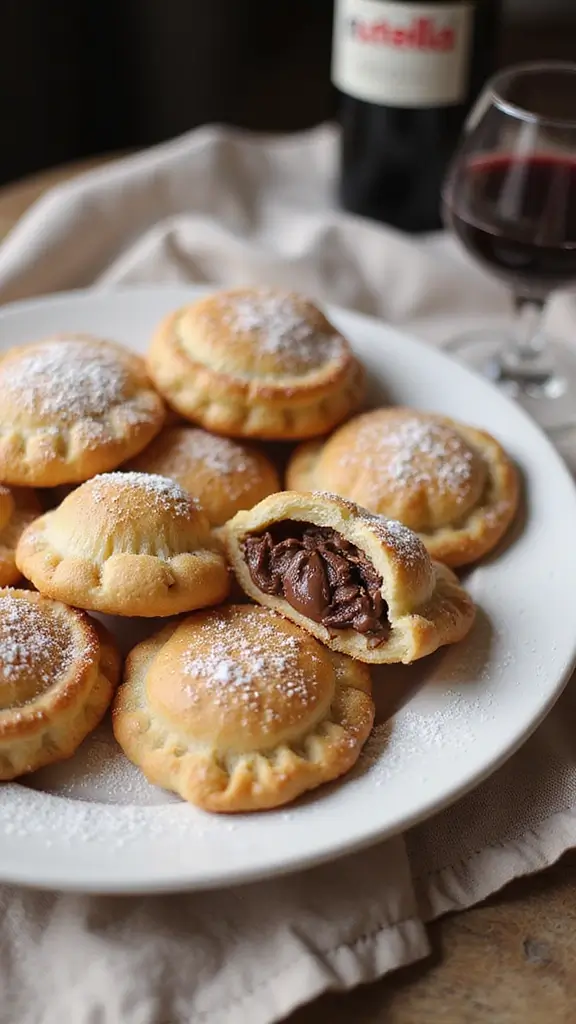
Are you craving a dessert that’s both indulgent and easy to make? Look no further than Nutella-Stuffed Puff Pastry! Imagine biting into a light, flaky pastry filled with warm, gooey Nutella. It’s the perfect treat for breakfast, a snack, or a sweet ending to your day. Pair it with a glass of dessert wine for an extra special touch!
Ready to whip these up? Here’s how:
Recipe Overview
– Servings: 8 pastries
– Prep Time: 15 minutes
– Cook Time: 15 minutes
– Total Time: 30 minutes
– Calories: About 250 per pastry
Ingredients
– 1 sheet of puff pastry, thawed
– 1/2 cup Nutella
– 1 egg, beaten (for egg wash)
– Powdered sugar for dusting
Instructions
1. Preheat your oven to 400°F (200°C) and line a baking sheet with parchment paper.
2. Roll out the puff pastry on a clean surface and cut it into 4×4 inch squares.
3. Place a tablespoon of Nutella in the center of each square.
4. Fold the pastry over to create a triangle, sealing the edges with a fork.
5. Brush the tops with the beaten egg for a golden finish.
6. Bake for 15 minutes or until they turn a lovely golden brown.
7. Dust with powdered sugar before serving.
Want to switch things up? You can fill these pastries with almond paste or fruit preserves for a fresh twist. Serve them warm for the best gooey experience.
Frequently Asked Questions
– Can I freeze these pastries? Yes! Freeze them before baking for a quick treat later.
– How long do they stay fresh? Enjoy them fresh, but they can last 2-3 days in an airtight container.
Now you have a delicious recipe to impress your friends and family. Get ready to enjoy these delightful pastries anytime!
12. Raspberry Mint Sorbet
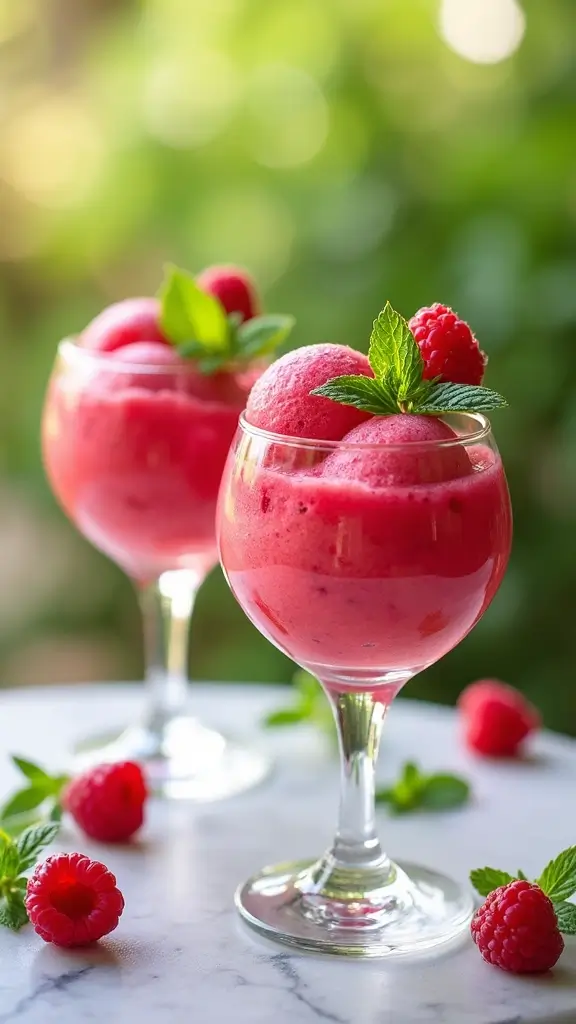
Beat the heat with a delightful raspberry mint sorbet! This treat is not just refreshing; it’s a burst of berry goodness that dances on your taste buds. The tangy raspberries mix perfectly with cool mint, making it a crowd-pleaser at your summer gatherings. Want to impress? Serve it with a splash of sparkling wine!
Here’s how to whip up this easy dessert. You’ll need just a few simple ingredients and a little patience while it freezes. It’s perfect for hot days, and you can make it ahead of time. Just follow these steps for a deliciously smooth sorbet that everyone will love.
Ingredients
– 2 cups fresh raspberries
– 1/2 cup sugar
– 1/2 cup water
– 1 tablespoon fresh mint leaves, chopped
– Juice of 1 lemon
Instructions
1. In a saucepan over medium heat, combine sugar and water. Stir until the sugar dissolves.
2. Add the raspberries and cook for about 5 minutes until they soften. Then, purée the mixture in a blender until it’s smooth.
3. In a mixing bowl, combine the raspberry purée, chopped mint, and lemon juice.
4. Pour the mixture into a shallow container and freeze for at least 4 hours. Stir every hour to break up any ice crystals.
5. Serve in chilled bowls or glasses.
For extra fun, add some chopped mint leaves right before serving. Garnish with fresh raspberries and mint sprigs for a beautiful touch!
Frequently Asked Questions
– Can I use frozen raspberries? Yes, just thaw them and drain any extra water.
– How should I store leftovers? Keep them in an airtight container in the freezer for up to 2 weeks!
Make this sorbet your go-to dessert for summer, and you’ll always be the star of the gathering!
13. Pecan Pie Bars with Maple Drizzle
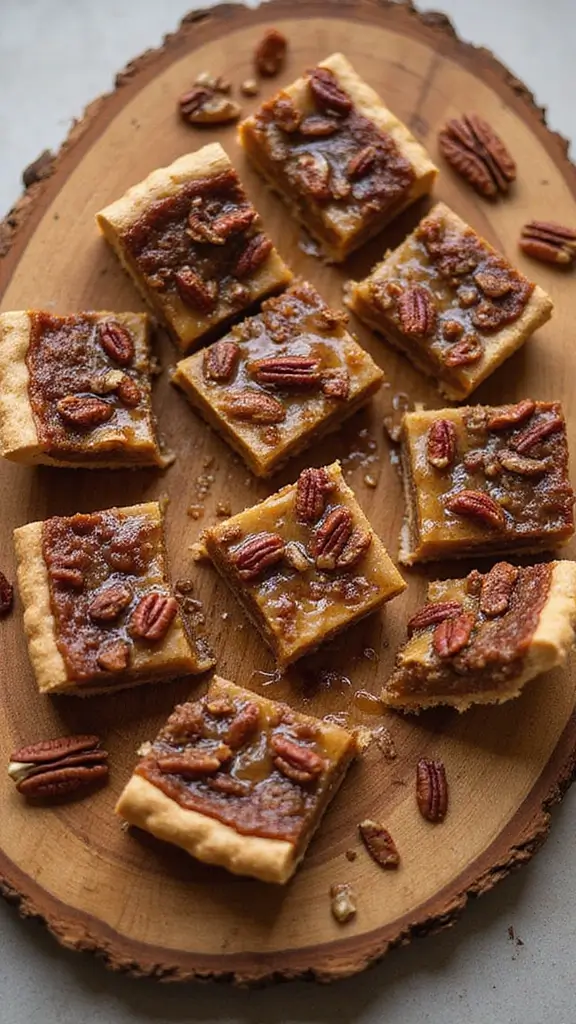
Craving the deliciousness of pecan pie but need a treat that’s easy to share? Try these scrumptious pecan pie bars with a delightful maple drizzle. They capture all the rich, nutty flavors of the classic pie, but in a convenient bar form. Perfect for gatherings, these bars are sure to impress your friends and family. Pair them with a warm cup of coffee or a sweet dessert wine for a cozy experience.
Recipe Overview
– Servings: 16 bars
– Prep Time: 25 minutes
– Cook Time: 35 minutes
– Total Time: 1 hour
– Calories: About 300 per bar
Ingredients
– 1 cup flour
– 1/2 cup brown sugar
– 1/2 cup cold butter, cubed
– 1 cup pecans, chopped
– 1/2 cup maple syrup
– 2 eggs
– 1 teaspoon vanilla extract
Instructions
1. Preheat your oven to 350°F (175°C). Line a baking dish with parchment paper.
2. In a bowl, mix the flour, brown sugar, and cold butter until crumbly.
3. Press this mixture into the bottom of the prepared pan and bake for 15 minutes.
4. In another bowl, whisk together the chopped pecans, maple syrup, eggs, and vanilla.
5. Pour this pecan mixture over the crust and bake for another 20 minutes.
6. Allow to cool completely before cutting into bars. Drizzle with extra maple syrup before serving for added sweetness.
Want to switch things up? Add chocolate chips to the pecan mixture for a tasty twist. Enjoy these bars warm with a scoop of vanilla ice cream for the ultimate treat!
Frequently Asked Questions
– Can I freeze these bars? Yes, they freeze wonderfully for up to 3 months.
– How should I store leftovers? Keep them in an airtight container at room temperature for up to a week.
These pecan pie bars are not just delicious; they’re also easy to make and perfect for any occasion. Enjoy baking!
14. Carrot Cake Cupcakes with Cream Cheese Frosting
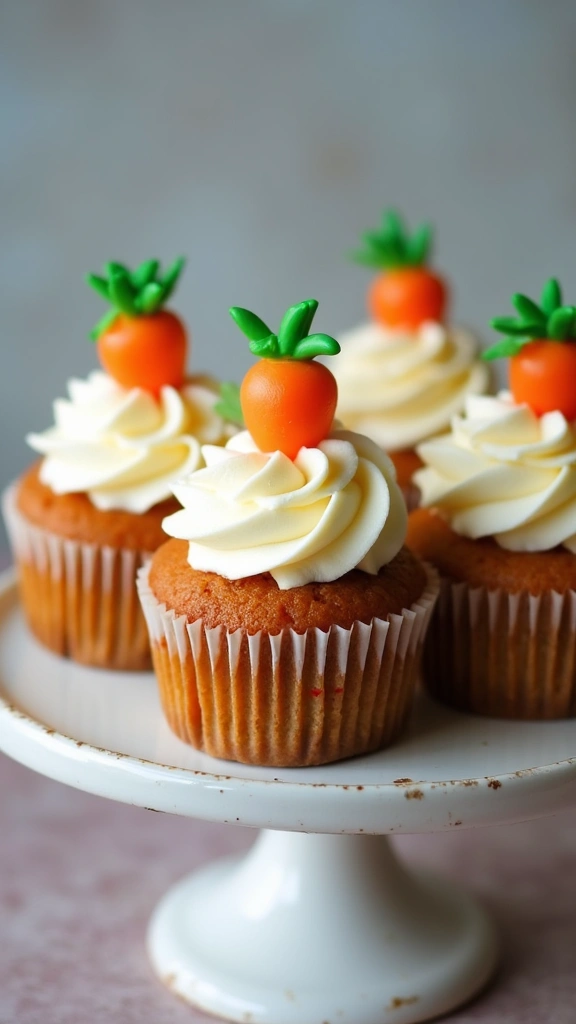
Craving something sweet? Try these delightful carrot cake cupcakes with cream cheese frosting. They are moist, fluffy, and bring a fresh twist to the classic dessert. With warm spices and a creamy topping, these cupcakes are perfect for parties, gatherings, or a cozy afternoon treat. Pair them with your favorite tea or a glass of dessert wine for a truly indulgent experience.
Recipe Overview
– Servings: 12 cupcakes
– Prep Time: 20 minutes
– Cook Time: 25 minutes
– Total Time: 45 minutes
– Calories: About 250 per cupcake
Ingredients
– 1 1/2 cups all-purpose flour
– 1 teaspoon baking powder
– 1 teaspoon baking soda
– 1/2 teaspoon salt
– 1 teaspoon ground cinnamon
– 1 cup granulated sugar
– 1/2 cup vegetable oil
– 2 large eggs
– 1 1/2 cups grated carrots
Frosting Ingredients
– 8 ounces cream cheese, softened
– 1/2 cup butter, softened
– 4 cups powdered sugar
– 1 teaspoon vanilla extract
Instructions
1. Preheat your oven to 350°F (175°C). Line a cupcake tin with liners.
2. In a bowl, whisk together the flour, baking powder, baking soda, salt, and cinnamon.
3. In another bowl, mix the sugar, oil, and eggs until well combined. Stir in the grated carrots.
4. Gradually combine the wet and dry ingredients, mixing until just blended.
5. Fill each cupcake liner about two-thirds full with batter. Bake for 20-25 minutes.
6. Let them cool completely before frosting.
7. For the frosting, beat the softened cream cheese and butter together until creamy. Gradually add the powdered sugar and vanilla extract.
8. Frost each cupcake and, if you like, top with chopped nuts or carrot decorations.
Tips:
– Add crushed pineapple for extra moisture and flavor.
– Bake these cupcakes a day ahead and store them in the fridge for a convenient treat.
Frequently Asked Questions
– Can I use whole wheat flour? Yes, but it may change the texture slightly.
– How long do they stay fresh? Keep them in an airtight container for 3-4 days.
Enjoy crafting these delightful cupcakes that are sure to impress!
15. Coconut Macaroons with Dark Chocolate Drizzle
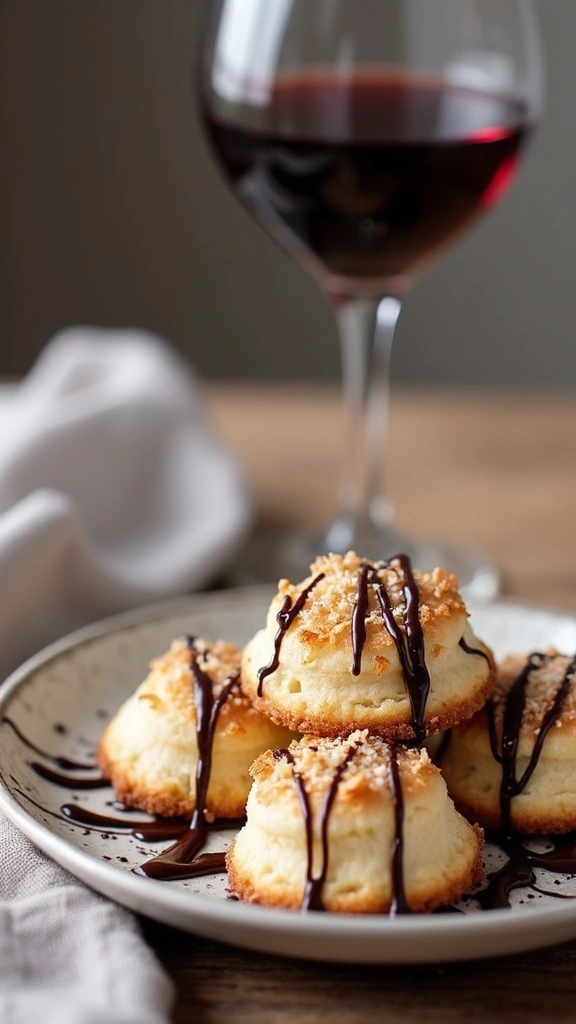
Indulge in the delightful world of coconut macaroons! These chewy, sweet treats are a coconut lover’s dream. Topped with rich dark chocolate, they create a perfect harmony of flavors. You can whip them up quickly and enjoy them with a glass of dessert wine for an elegant touch.
Here’s how to make these delicious macaroons:
Recipe Overview
– Servings: 18 macaroons
– Prep Time: 10 minutes
– Cook Time: 25 minutes
– Total Time: 35 minutes
– Calories: About 150 per macaroon
Ingredients
– 3 cups shredded coconut
– 1/2 cup sugar
– 2 large egg whites
– 1 teaspoon vanilla extract
– 1/2 cup dark chocolate chips (for drizzling)
Instructions
1. Preheat your oven to 325°F (160°C) and line a baking sheet with parchment paper.
2. In a large bowl, mix the shredded coconut, sugar, egg whites, and vanilla until well combined.
3. Scoop tablespoon-sized portions onto the prepared baking sheet.
4. Bake for 20-25 minutes until the edges turn golden brown.
5. Allow the macaroons to cool completely on the baking sheet.
6. Melt the chocolate chips in the microwave and drizzle over the cooled macaroons.
Store your macaroons in an airtight container to keep them fresh. If you’re feeling adventurous, you can enjoy them without chocolate too!
Frequently Asked Questions
– Can I make these vegan? Yes, just swap the egg whites for aquafaba!
– How long do they last? They stay fresh for about a week!
16. Blueberry Crumble Bars
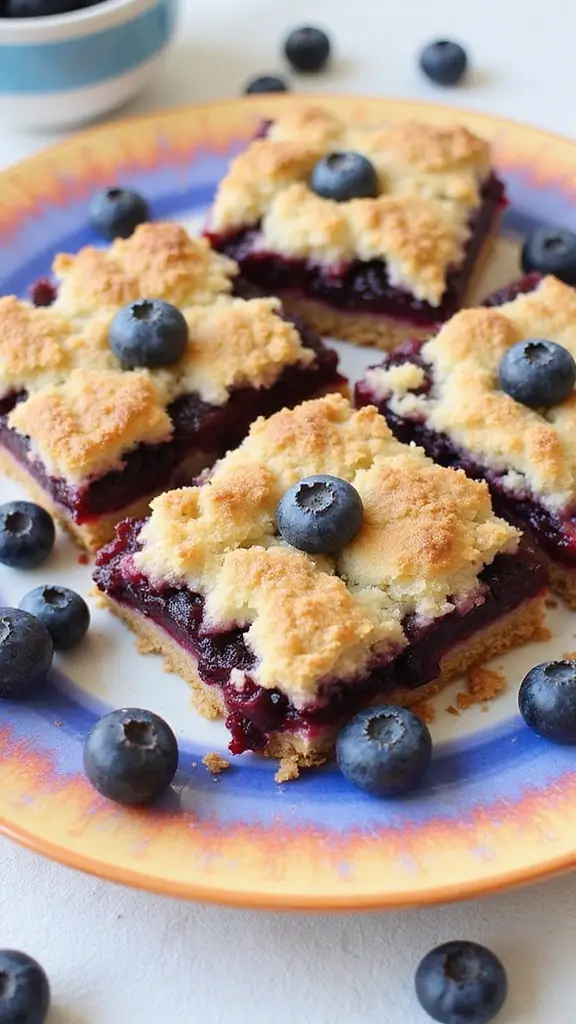
Indulge in the delightful taste of these blueberry crumble bars! Imagine juicy blueberries bursting with flavor, tucked between two layers of sweet, crumbly goodness. These bars are not just a dessert; they make a perfect snack or even a grab-and-go breakfast. Pair them with a refreshing light Chardonnay for a delightful treat.
Recipe Overview
– Servings: 12 bars
– Prep Time: 15 minutes
– Cook Time: 30 minutes
– Total Time: 45 minutes
– Calories: About 220 per bar
Ingredients
– 2 cups rolled oats
– 1 cup all-purpose flour
– 1/2 cup granulated sugar
– 1/2 teaspoon salt
– 1/2 cup melted butter
– 2 cups fresh blueberries
– 1 tablespoon lemon juice
Instructions
1. Preheat your oven to 350°F (175°C) and grease a baking dish.
2. In a bowl, combine oats, flour, sugar, and salt. Stir in the melted butter until the mixture looks crumbly.
3. Press half of this oat mixture into the bottom of the greased baking dish.
4. Toss the blueberries with lemon juice, then spread them evenly over the crust.
5. Sprinkle the remaining oat mixture on top.
6. Bake for 30 minutes until the top is golden brown and bubbling.
7. Allow to cool completely before cutting into bars.
Want to mix things up? Try using raspberries or blackberries instead of blueberries. For an extra touch of sweetness, drizzle a simple glaze over the bars!
Frequently Asked Questions
– Can I use frozen blueberries? Yes, just remember to thaw them and drain any excess moisture.
– How do I store leftovers? Keep them in an airtight container for up to a week!
These blueberry crumble bars are not just tasty; they’re also a great way to enjoy some fruit. You’ll love how easy they are to make!
17. S’mores Dip
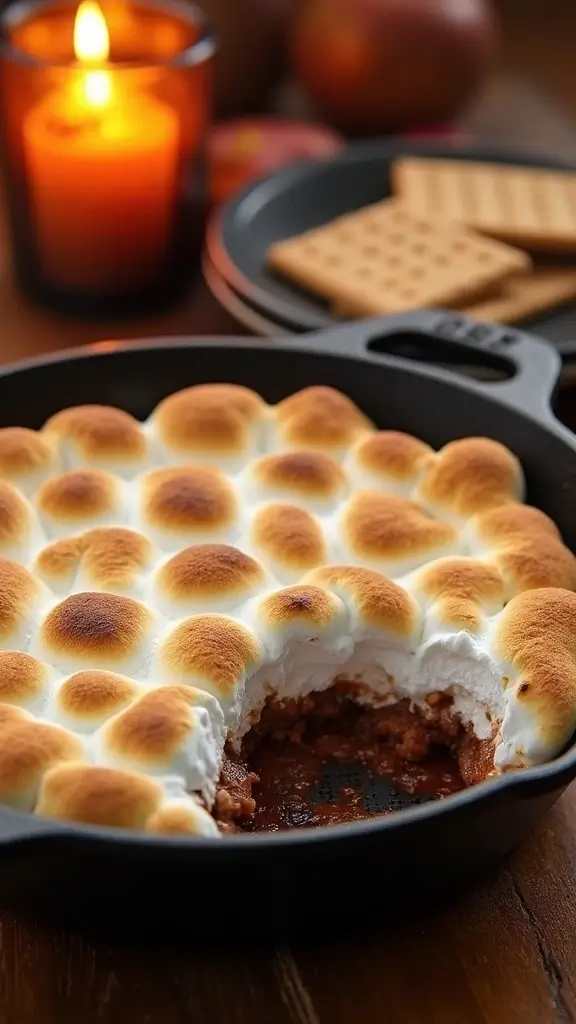
Imagine bringing the cozy warmth of a campfire right into your kitchen. That’s exactly what S’mores Dip does! This delightful dessert layers melted chocolate, fluffy marshmallows, and crunchy graham crackers in a way that’s perfect for sharing. Whether you’re throwing a party or just indulging on a cozy night in, this dip is a sweet treat you won’t want to miss.
Serve it warm, and you’ll want to dive right in with graham crackers or even fresh fruit. Pair it with a rich stout beer or a sweet dessert wine to elevate your experience!
Recipe Overview
– Servings: 8
– Prep Time: 10 minutes
– Cook Time: 10 minutes
– Total Time: 20 minutes
– Calories: About 300 per serving
Ingredients
– 1 cup chocolate chips
– 1 cup mini marshmallows
– 1/4 cup graham cracker crumbs
– 1 tablespoon butter
Instructions
1. Preheat your oven to 450°F (230°C).
2. In a cast-iron skillet, melt the butter and chocolate chips over low heat, stirring until smooth.
3. Remove from heat and sprinkle mini marshmallows and graham cracker crumbs on top.
4. Bake in the oven for 5-7 minutes until the marshmallows turn golden brown and toasted.
5. Serve immediately with graham crackers or fresh fruit for dipping.
Want to mix it up? Add peanut butter or Nutella for a creamy twist! Enjoy this treat fresh from the oven for the best experience.
Frequently Asked Questions
– Can I use dark chocolate? Yes! Dark chocolate will give your dip a richer taste.
– How do I store leftovers? Keep any leftover dip in an airtight container for up to 2 days, but trust me, it’s best enjoyed fresh!
18. Mango Sticky Rice
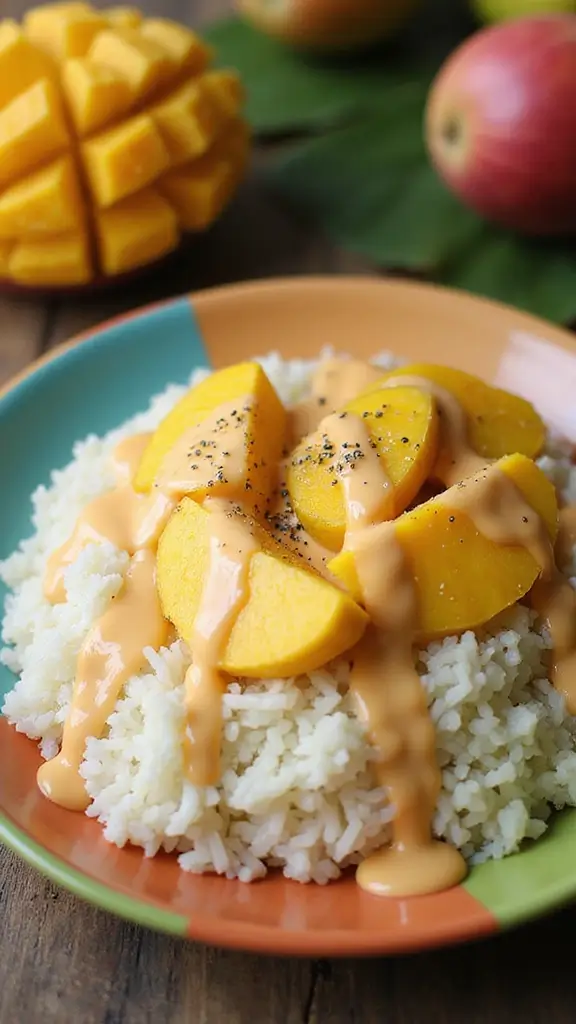
Indulge in the sweet taste of Thailand with Mango Sticky Rice, a dessert that delights the senses. This dish combines creamy coconut sticky rice with juicy, ripe mango slices. It’s a perfect balance of flavors that will impress your guests. Pair it with a sweet dessert wine for an unforgettable experience.
Recipe Overview
– Servings: 4
– Prep Time: 15 minutes
– Cook Time: 30 minutes
– Total Time: 45 minutes
– Calories: Approximately 300 per serving
Ingredients
– 1 cup glutinous rice
– 1 1/2 cups coconut milk
– 1/2 cup sugar
– 2 ripe mangoes, sliced
– A pinch of salt
Instructions
1. Rinse the glutinous rice and soak it in water for at least 30 minutes. Drain the rice.
2. Steam the rice for about 25 minutes, or until it’s tender.
3. In a saucepan, mix coconut milk, sugar, and salt over low heat until combined.
4. Once the rice is cooked, stir in half of the coconut sauce.
5. Serve the sticky rice on plates, add mango slices on the side, and drizzle with the remaining coconut sauce.
For extra flavor, sprinkle some toasted sesame seeds or coconut flakes on top. Enjoy this dish fresh for the best taste!
Frequently Asked Questions
– Can I use regular rice? Stick to glutinous rice for the best texture!
– How do I store leftovers? Keep them in an airtight container in the fridge for 1-2 days.
This simple yet delicious dessert will become a favorite in your home. Enjoy the tropical vibes with every bite!
19. Pistachio Baklava Bites
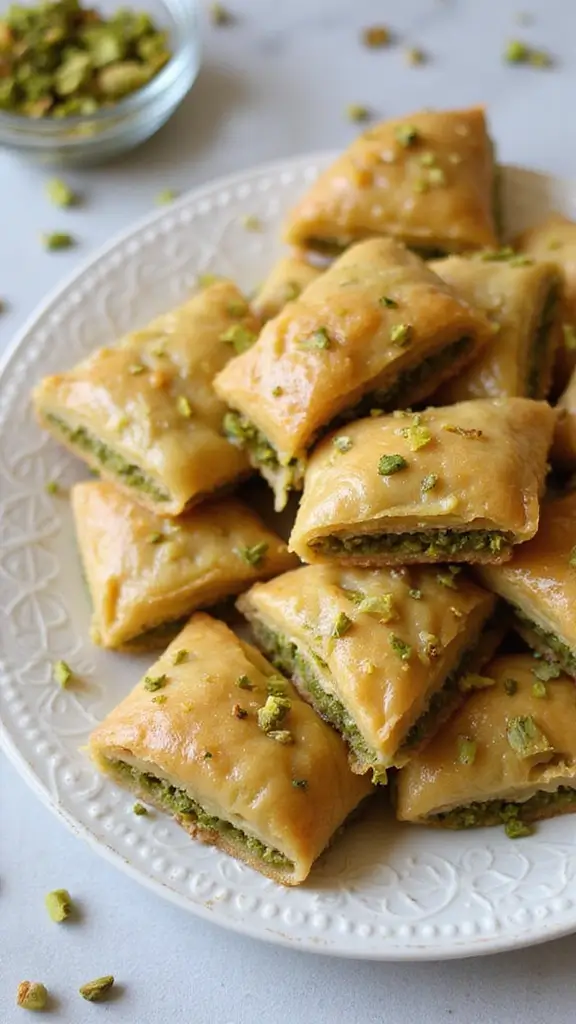
Indulge in these scrumptious pistachio baklava bites! This twist on the beloved Middle Eastern classic features layers of crispy phyllo dough, crunchy pistachios, and a sweet honey drizzle. They’re not just tasty; they’re a feast for the eyes, too. Serve them at your next gathering with a refreshing cup of tea or a light dessert wine, and watch your guests smile.
Recipe Overview
– Servings: 24 bites
– Prep Time: 30 minutes
– Cook Time: 30 minutes
– Total Time: 1 hour
– Calories: About 180 per bite
Ingredients
– 1 package of phyllo dough
– 2 cups chopped pistachios
– 1/2 cup melted butter
– 1/2 cup sugar
– 1/2 cup honey
– 1 teaspoon vanilla extract
Instructions
1. Preheat your oven to 350°F (175°C).
2. In a bowl, combine chopped pistachios and sugar.
3. Lay out phyllo dough in a baking dish, brushing each layer with melted butter.
4. Spread the pistachio mixture evenly over the phyllo layers.
5. Add more phyllo on top, brushing each layer with butter.
6. Cut into bite-sized squares.
7. Bake for 30 minutes until golden brown.
8. Drizzle with honey, then let cool before serving.
Remember to keep the phyllo dough covered with a damp cloth to prevent it from drying out. You can prepare these bites in advance, making them a fantastic option for parties!
Frequently Asked Questions
– Can I use other nuts? Yes! Walnuts or almonds make great substitutes.
– How long do leftovers last? They stay fresh for several days at room temperature.
20. Almond Joy Energy Bites
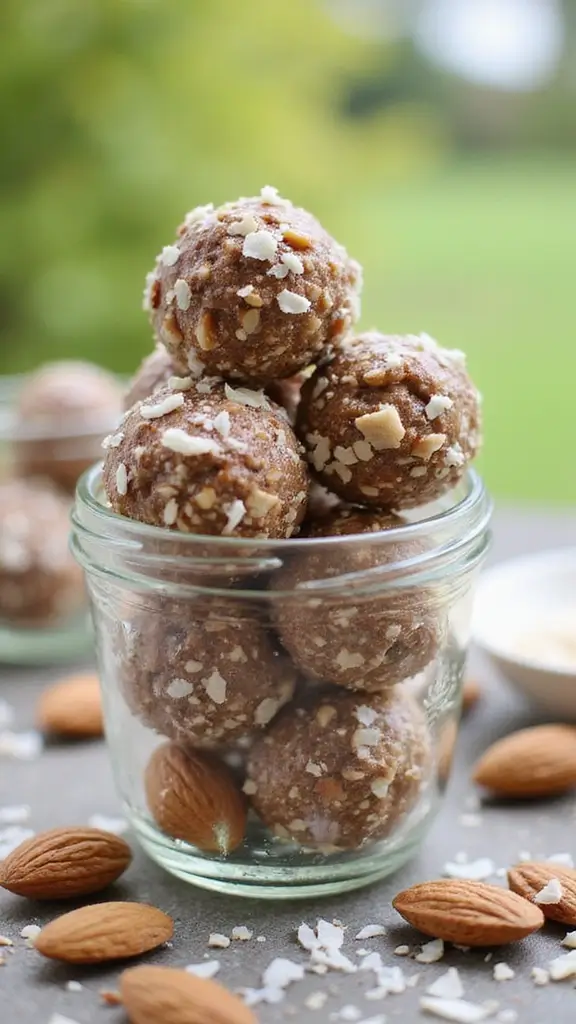
Craving a quick energy boost? Try these delicious Almond Joy Energy Bites! They combine the rich flavors of almond butter, coconut, and dark chocolate, making them the perfect healthy snack or dessert. Not only are they simple to whip up, but they also make a great grab-and-go option for busy days. Enjoy them with your morning coffee or as an afternoon treat to keep your energy up!
Recipe Overview
– Servings: 12 energy bites
– Prep Time: 10 minutes
– Refrigerate Time: 30 minutes
– Total Time: 40 minutes
– Calories: About 150 per bite
Ingredients
– 1 cup oats
– 1/2 cup almond butter
– 1/4 cup honey
– 1/2 cup shredded coconut
– 1/4 cup dark chocolate chips
Instructions
1. In a large bowl, combine all the ingredients. Stir until everything is mixed well.
2. Roll the mixture into bite-sized balls.
3. Place the bites on a plate and refrigerate for at least 30 minutes to help them firm up.
4. Enjoy them chilled or at room temperature!
Feel free to add some chia seeds or flaxseeds for an extra nutritional punch. These bites store well in the fridge, making them a perfect quick snack during your busy week.
Frequently Asked Questions
– Can I switch almond butter for peanut butter? Yes! Just know the flavor will change a bit.
– How long can I keep these bites? They stay fresh in the fridge for about a week!
With these easy energy bites, you can indulge in a tasty treat that supports your healthy lifestyle!
21. Strawberry Shortcake Parfaits
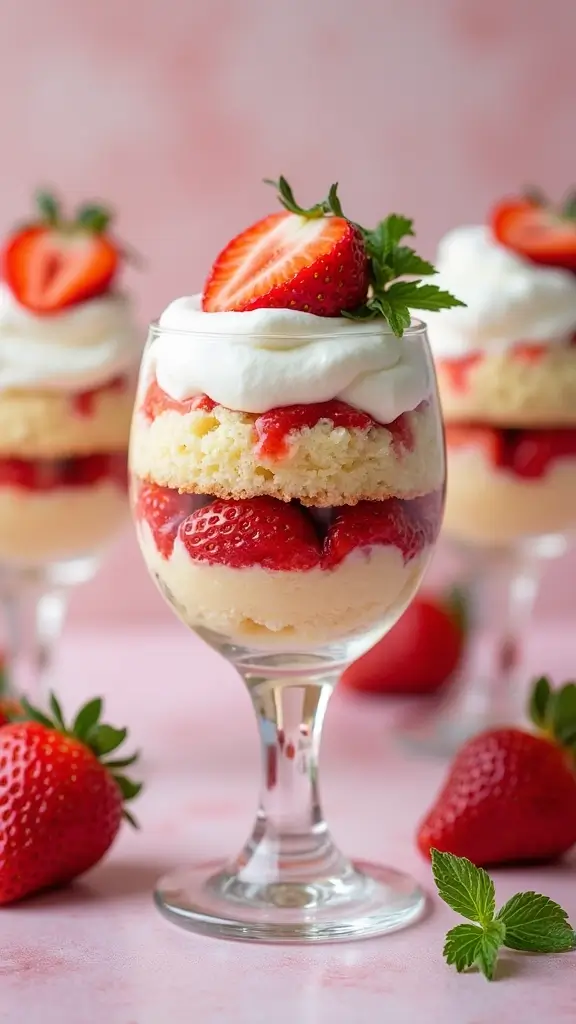
Prepare yourself for a simple yet delightful dessert that will impress your guests! Strawberry shortcake parfaits combine fluffy cake, juicy strawberries, and light whipped cream in stylish cups. This treat is perfect for summer parties or as a sweet end to dinner. Pair it with a refreshing sparkling wine to elevate your celebration.
Now, let’s dive into the recipe!
Recipe Overview
– Servings: 6 parfaits
– Prep Time: 20 minutes
– Total Time: 20 minutes
– Calories: Approx. 200 per parfait
Ingredients
– 1 pound fresh strawberries, sliced
– 1 tablespoon sugar
– 1 pound store-bought angel food cake or shortcake
– 2 cups whipped cream
Instructions
1. Start by mixing the sliced strawberries with sugar. Let them sit for 10 minutes to enhance their sweetness.
2. Tear the angel food cake into bite-sized pieces.
3. Grab some serving glasses and layer the cake pieces, strawberries, and whipped cream.
4. Repeat these layers until the glasses are full.
5. Top each parfait with a fresh strawberry for a beautiful finish.
Want to add some flair? Mix in a splash of liqueur with the strawberries for an adult twist! You can also prepare these parfaits a few hours in advance and store them in the fridge.
Frequently Asked Questions
– Can I use frozen strawberries? Yes, but thaw and drain them first for the best texture.
– How should I store leftovers? Keep them in the fridge for up to 2 days and enjoy!
Now you have a fun and easy dessert that will wow your friends and family. Enjoy every delicious spoonful!
22. Chocolate Hazelnut Pancakes
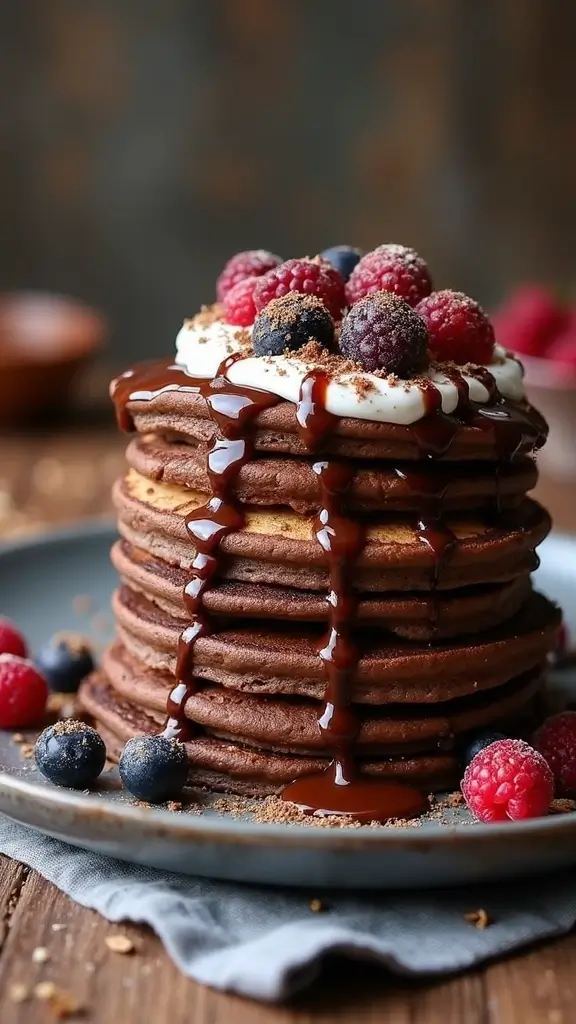
Elevate your breakfast game with these luscious chocolate hazelnut pancakes! They blend the richness of chocolate with the crunch of hazelnuts, turning any morning into a special occasion. Picture fluffy, warm pancakes drizzled with silky chocolate sauce and adorned with fresh berries. Pair them with a fruity coffee or a sweet dessert wine for a truly delightful brunch experience.
Recipe Overview
– Servings: 4
– Prep Time: 20 minutes
– Cook Time: 15 minutes
– Total Time: 35 minutes
– Calories: About 350 per serving
Ingredients
– 1 cup all-purpose flour
– 1/4 cup cocoa powder
– 1/4 cup sugar
– 1 teaspoon baking powder
– 1/2 teaspoon baking soda
– 1/4 teaspoon salt
– 1 cup milk
– 1/2 cup chocolate hazelnut spread
– 1 large egg
– Optional toppings: whipped cream, berries, chocolate sauce
Instructions
1. In a bowl, whisk together the flour, cocoa powder, sugar, baking powder, baking soda, and salt.
2. In another bowl, mix the milk, chocolate hazelnut spread, and egg until smooth.
3. Combine the wet and dry ingredients, mixing until just combined.
4. Heat a skillet over medium heat and pour about 1/4 cup of batter for each pancake.
5. Cook until bubbles form, then flip and cook until golden brown.
6. Serve with your choice of toppings.
For a fun twist, stack your pancakes high and drizzle with chocolate sauce for an eye-catching presentation. You can also sprinkle crushed nuts on top for extra texture and flavor.
Frequently Asked Questions
– Can I make these gluten-free? Yes, simply swap the all-purpose flour for a gluten-free blend.
– How do I store leftovers? Keep them in an airtight container in the fridge for up to 2 days!
These chocolate hazelnut pancakes are not just a meal; they’re a moment to savor. Perfect for family gatherings or a cozy brunch with friends, they’ll surely impress. Enjoy every bite!
23. Churros with Chocolate Sauce
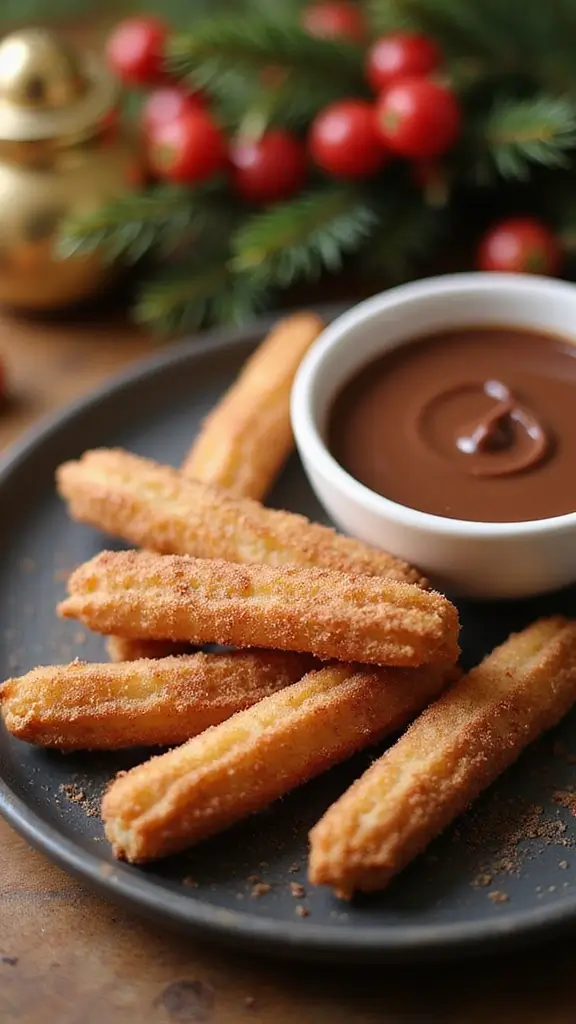
Churros are a delightful way to satisfy your sweet tooth! These crispy, cinnamon-sugar-coated treats are not only fun to make but also incredibly delicious. Dip them in warm, rich chocolate sauce for an experience that’s sure to impress. Enjoy with a nice dessert drink, and you have a perfect ending to any meal!
Recipe Overview
– Servings: 12 churros
– Prep Time: 30 minutes
– Cook Time: 10 minutes
– Total Time: 40 minutes
– Calories: About 200 per churro
Ingredients
– 1 cup water
– 1/2 cup butter
– 1 cup flour
– 1/4 teaspoon salt
– 2 eggs
– 1/2 cup sugar (for coating)
– 1 teaspoon cinnamon
– 1 cup chocolate chips (for dipping)
Instructions
1. In a medium saucepan, bring the water and butter to a boil.
2. Add flour and salt, stirring until it forms a ball.
3. Remove from heat and let cool for a few minutes.
4. Mix in the eggs until the dough is smooth.
5. Heat oil in a deep fryer or a heavy pot.
6. Transfer the dough to a piping bag fitted with a star tip.
7. Pipe strips of dough into the hot oil. Fry until golden brown, then coat in a mix of sugar and cinnamon.
8. For the chocolate sauce, melt the chocolate chips in the microwave or a double boiler until smooth.
9. Serve the churros warm with the chocolate sauce on the side for dipping.
Want to add something special? Try filling the churros with cream or chocolate before frying! They taste best fresh, right out of the fryer.
Frequently Asked Questions
– Can I bake churros instead? Baking is possible, but frying gives them the best texture.
– How long do leftovers last? For the best flavor, eat them the same day they’re made!
Churros with Chocolate Sauce
Editor’s Choice

Riccle Piping Bags and Tips Set, 11.8 Inch 100 Anti Burst Piping Bags, 1…

T-fal 3.5L Stainless Steel Deep Fryer with Basket for Home Use, 1700W, D…

Wilton Candy Melts Melting Pot, Perfect for Dipping, Drizzling & Decorat…
Conclusion
With these 23 dessert recipe makeovers, it’s clear that classics can evolve into modern delights! Each recipe not only tantalizes the taste buds but also brings a fresh flair to the table.
Whether you’re hosting a gathering or just treating yourself, these desserts are bound to impress. So, gather your ingredients and get ready to create some culinary magic!
Note: We aim to provide accurate product links, but some may occasionally expire or become unavailable. If this happens, please search directly on Amazon for the product or a suitable alternative.
This post contains Amazon affiliate links, meaning I may earn a small commission if you purchase through my links, at no extra cost to you.
Frequently Asked Questions
What Are Some Modern Twists on Classic Dessert Recipes?
If you’re looking to give classic dessert recipes a modern makeover, think about incorporating unexpected ingredients like avocado in brownies or using chia seeds in puddings. You could also swap traditional flours for almond flour or coconut flour to create gluten-free options that still taste divine. The key is to balance flavor with innovative textures, making your desserts not just delicious but also a feast for the senses!
How Can I Pair Wine With My Dessert Recipe Makeovers?
Wine pairings can elevate your dessert experience to a whole new level! For fruity desserts, a sweet Moscato pairs beautifully, while chocolate delights shine with a robust Port. If you’re experimenting with cheesecake, consider a creamy Sauternes. Remember to balance the sweetness of your dessert with your wine choice for the best flavor harmony. Don’t hesitate to try new combinations—your palate will thank you!
What Are Some Entertaining Ideas to Showcase My Dessert Recipe Makeovers?
Hosting a gathering? Why not create a dessertery where guests can build their own dessert plates? Offer a variety of your modernized treats alongside toppings and sauces. This interactive approach not only lets everyone customize their experience but also adds a fun twist to your entertaining ideas. You could also incorporate themed dessert pairings with wine or cheese to impress your guests even more!
Can I Use Seasonal Ingredients in My Dessert Recipe Makeovers?
Absolutely! Using seasonal ingredients not only enhances the flavor of your desserts but also adds freshness and vibrancy. Think pumpkin in the fall, fresh berries in the summer, or citrus fruits in winter. These ingredients can transform your classic recipes into modern treats that reflect the season, making them even more delightful to enjoy. Plus, your desserts will be more sustainable and cost-effective!
How Do I Choose the Right Cheese Pairings for My Dessert Recipes?
Choosing the right cheese pairings can add an exciting dimension to your dessert experience! For creamy desserts, try pairing with a rich Brie or Mascarpone. If your dessert is fruity, a tangy goat cheese can complement the flavors beautifully. Don’t forget the classic blue cheese with sweet desserts for an adventurous twist. Experimenting with these combinations can lead to delicious discoveries that wow your guests!